
 Pin it
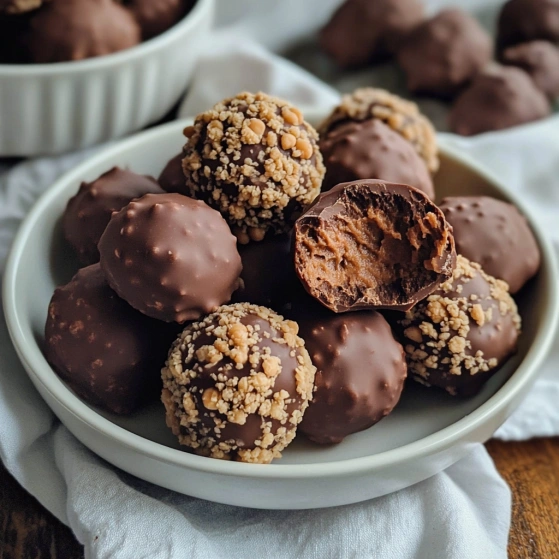
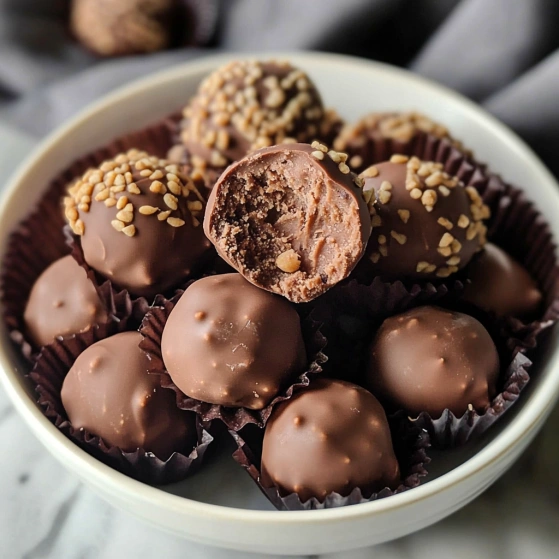
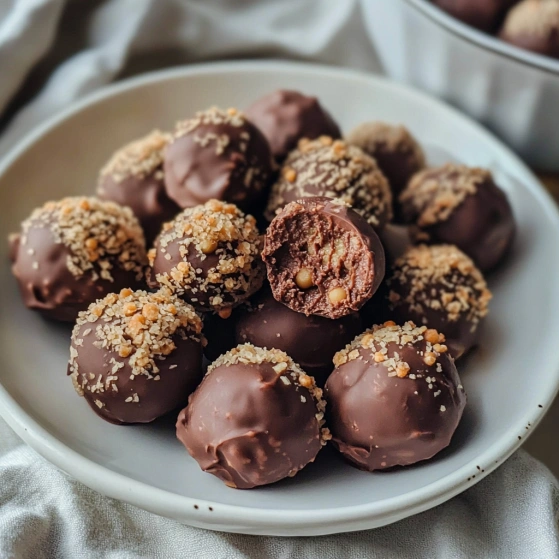
These decadent chickpea truffles transform an ordinary pantry staple into a luxurious dessert that satisfies chocolate cravings while adding a secret boost of protein and fiber. The creamy interior pairs beautifully with the snappy chocolate coating, creating the perfect bite-sized treat for any occasion.
I first created these when searching for a healthier dessert that wouldn't compromise on indulgence. My skeptical friends couldn't believe chickpeas were the secret ingredient—their faces when I revealed it still makes me laugh!
Ingredients
- Canned chickpeas: Form the surprising yet neutral base that adds protein and creates the perfect truffle texture
- Nut or seed butter: Provides richness and helps bind everything together without needing added sugar
- Dark chocolate chips: Deliver that intense chocolate flavor we crave in truffles while keeping the recipe plant-based
- Coconut oil: Helps thin the chocolate coating for the perfect snap when you bite in
- Optional toppings: Like cacao nibs add textural contrast and visual appeal while personalizing your batch
Step-by-Step Instructions
- Prepare the chickpeas:
- Thoroughly drain and rinse one can of chickpeas to remove any canning liquid. This ensures a clean flavor base for your truffles. Pat them dry with a paper towel for best results.
- Melt the interior chocolate:
- Carefully melt one cup of dark chocolate chips either in 30-second microwave intervals stirring between each or using a double boiler until completely smooth. This creates the rich chocolate base for your truffle filling.
- Blend the filling:
- Combine drained chickpeas, nut butter, and melted chocolate in a food processor. Process for a full 45-60 seconds until completely smooth without any visible chickpea pieces. Scrape down the sides halfway through for even blending.
- Form the truffle centers:
- Use a cookie scoop to portion out uniform balls onto a parchment-lined baking sheet. The consistency should be thick but workable. Freeze for 15-20 minutes until firm enough to handle without sticking to your hands.
- Shape perfect spheres:
- Remove partially frozen truffle centers and quickly roll between your palms to create smooth, perfectly round shapes. Return to the freezer for another 10 minutes to fully set before dipping.
- Create the chocolate coating:
- Melt the second cup of chocolate chips with a tablespoon of coconut oil for a thinner, more fluid coating consistency. The oil helps create that professional shine and snap once hardened.
- Dip and decorate:
- Working quickly with one truffle at a time, dip each frozen center into the melted chocolate using a fork or dipping tool. Allow excess to drip off before returning to the parchment paper. Add toppings immediately before the chocolate sets.
- Set and store:
- Return the dipped truffles to the freezer for a final 15 minutes to completely set the outer chocolate layer. Transfer to an airtight container and store in the refrigerator for 7-10 days or freezer for 1-2 months.
 Pin it
The dark chocolate is truly the star ingredient here—I recommend using a high-quality variety with at least 70% cacao content for the richest flavor. I once served these at a dinner party without revealing the secret ingredient, and even my chef friend who usually scoffs at "healthy desserts" asked for the recipe!
Make-Ahead Magic
These truffles actually improve with a day or two in the refrigerator as the flavors meld together. This makes them perfect for entertaining or gift-giving since you can prepare them completely in advance. I often make a double batch and keep them in the freezer for those moments when a chocolate craving strikes unexpectedly.
 Pin it
Flavor Variations
The basic recipe provides an excellent canvas for experimentation. Try adding a teaspoon of espresso powder to the filling for a mocha version, or incorporate orange zest for a chocolate-orange combination. A touch of peppermint extract creates a refreshing after-dinner mint truffle, while a pinch of cayenne adds a surprising warmth that complements the chocolate beautifully.
Troubleshooting Tips
If your truffle mixture seems too soft to form balls, add 1-2 tablespoons of coconut flour to absorb excess moisture. Conversely, if the mixture is too firm, incorporate a touch more nut butter until you reach the desired consistency. For the smoothest coating experience, be sure your truffle centers are thoroughly chilled before dipping, and add coconut oil to thin the chocolate if needed.
Serving Suggestions
These truffles make a stunning addition to dessert platters when arranged in paper candy cups with various toppings. They pair wonderfully with after-dinner coffee or dessert wine. For an elevated presentation, place them in a small gift box lined with parchment paper for homemade gifts that will impress without revealing how simple they were to create.
Frequently Asked Questions
- → Can I use other beans instead of chickpeas?
While chickpeas work best due to their mild flavor and creamy texture, you could experiment with white beans like cannellini as a substitute. The texture and taste might vary slightly, but the concept remains the same.
- → What's the best nut butter to use for these truffles?
Almond and cashew butter are recommended as they have mild, complementary flavors that work well with chocolate. However, you can use any nut or seed butter based on preference or dietary restrictions - sunflower seed butter works well for a nut-free version.
- → Do these truffles taste like chickpeas?
No, the chocolate and nut butter effectively mask the chickpea flavor. Most people can't detect the chickpeas, making these a surprisingly deceptive treat that contains a protein boost.
- → Why do the truffles need to be frozen between steps?
Freezing helps the chickpea mixture firm up, making it easier to roll into balls and dip in chocolate. This creates a more defined shape and prevents the balls from falling apart during the chocolate coating process.
- → What chocolate works best for vegan truffles?
High-quality dark chocolate chips with at least 60% cocoa content work best. Make sure to check the ingredients list to confirm they're vegan (no milk products). Adding a little coconut oil helps the chocolate coating melt smoothly and set with a nice shine.
- → Can I make these truffles ahead of time?
Absolutely! These truffles store exceptionally well. Keep them refrigerated for 7-10 days or freeze them for 30-60 days. They're perfect for making in advance for parties or keeping on hand for sweet cravings.