
 Pin it
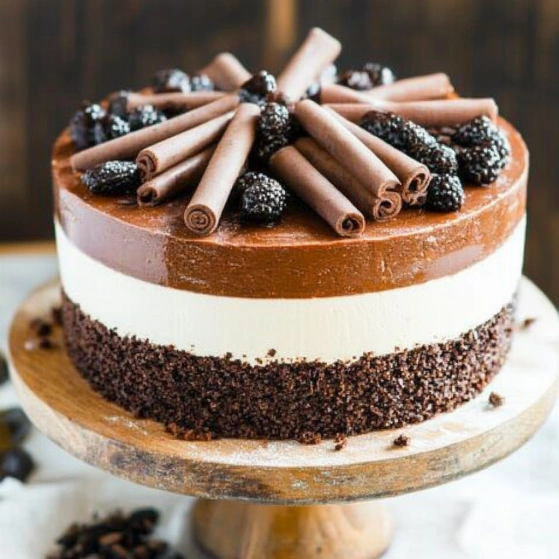
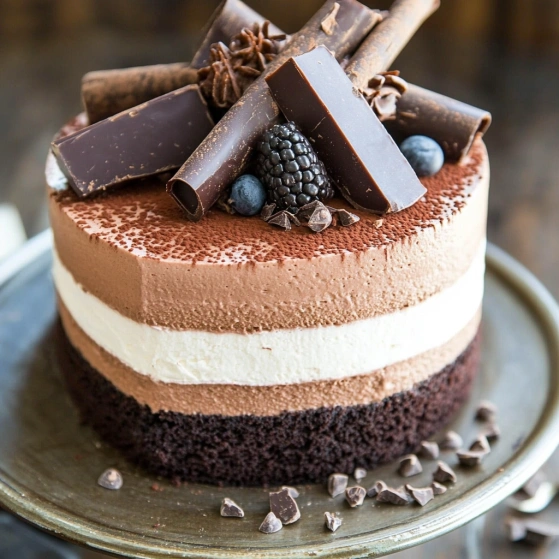
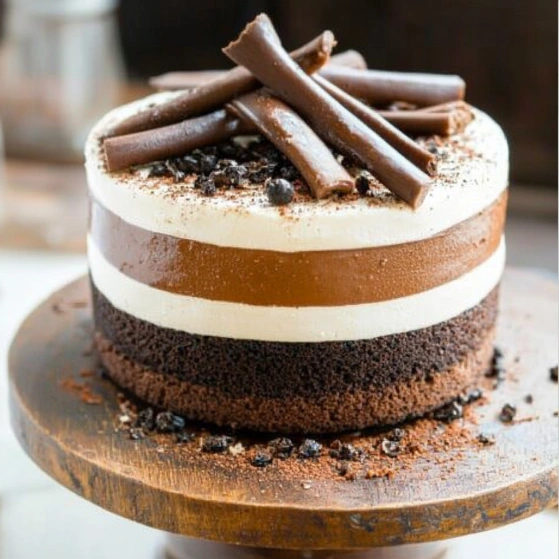
This Triple Chocolate Mousse Cake transforms any gathering into a special occasion with its impressive layers of decadence. The foundation begins with a rich chocolate cake, followed by silky chocolate fudge, velvety dark chocolate mousse, and topped with an ethereal white chocolate mousse. Each bite delivers multiple textures and chocolate flavors that slowly melt on your tongue, creating a dessert experience that's worth every moment spent in the kitchen.
The first time I served this cake at my sister's birthday, the room fell silent as everyone took their first bite. The layers held perfectly when sliced, and everyone asked for the recipe before they'd even finished their portion.
Ingredients
- Unsalted butter: Provides richness and structure to the cake base. Choose a quality brand for best flavor, and ensure it's truly at room temperature for proper creaming.
- Sugar: Balanced sweetness that complements the chocolate without overwhelming it. Fine granulated sugar works best for proper incorporation.
- Sour cream: Adds moisture and tenderness to the cake. Full-fat provides the best texture and richness.
- Vanilla extract: Enhances all chocolate flavors. Use pure extract rather than imitation for superior flavor.
- Egg whites: Create structure in the cake. Room temperature whites incorporate more easily into the batter.
- All-purpose flour: Provides the structure. Measure by weight for accuracy if possible.
- Special dark cocoa powder: The foundation of the chocolate flavor in the cake. Hershey's special dark gives a deeper color and flavor than regular cocoa.
- Baking powder: Provides lift to create a light texture. Check that it's fresh for proper rising.
- Semi-sweet chocolate chips: Used in both the fudge layer and mousse. Choose good quality chips that melt smoothly.
- Light corn syrup: Gives the fudge layer a glossy finish and smooth texture.
- Heavy whipping cream: The foundation of both mousses. Must be cold for proper whipping, except when used for melting chocolate.
- Egg yolks: Enrich the chocolate mousse and provide structure. Fresh eggs separate more easily.
- White chocolate chips: Choose a quality brand that contains cocoa butter for best melting and flavor.
- Unflavored powdered gelatin: Stabilizes the white chocolate mousse for a firm, sliceable texture.
Instructions
- Step 1:
- Mix the butter and sugar until truly fluffy, which takes a full 3-4 minutes of beating. This isn't just mixing—the mixture should visibly increase in volume and turn several shades lighter. This process incorporates air that gives the cake its tender crumb. Add the sour cream and vanilla, ensuring they're fully incorporated before proceeding to the egg whites. Add each egg white individually, allowing it to fully disappear into the batter before adding the next. Whisk your dry ingredients separately to ensure even distribution of leavening agents. When adding the dry ingredients and liquids, mix just until combined after each addition to prevent developing gluten which would make the cake tough. Pour the batter carefully into your prepared pan, ensuring it's even for level baking.
- Step 2:
- Monitor the cake closely as it approaches the 19-minute mark. The toothpick test should reveal a few moist crumbs—not wet batter, but not completely clean either. This ensures the cake remains moist. Cool initially in the pan to allow the structure to set, then transfer to a rack where air can circulate around the entire cake for even cooling. Wait until the cake is completely cool before proceeding—even slight warmth can melt your fudge layer.
- Step 3:
- Prepare your springform pan meticulously, as this will determine how cleanly you can unmold the finished cake. The parchment should extend above the rim to contain all the layers. When trimming the cake dome, use a long serrated knife and a gentle sawing motion for the cleanest cut. Position the cake layer evenly in the center of your prepared pan to ensure your final cake has even sides.
- Step 4:
- Place your chocolate, corn syrup, and vanilla in a deep bowl that allows room for stirring without spillage. Heat the cream just until bubbles form around the edges—boiling it too long can cause the fats to separate. After pouring over the chocolate, the covered bowl creates a mini steam environment that helps melt the chocolate evenly. When whisking, start from the center and work outward in concentric circles to gradually incorporate all ingredients without splashing. Spread the fudge immediately while it's still fluid enough to create a perfectly smooth layer.
- Step 5:
- When cooking the egg mixture, maintain a gentle heat that warms the mixture without scrambling the eggs. The mixture is ready when it coats the back of a spoon and leaves a clear trail when you run your finger through it. Melt the chocolate gradually to prevent scorching. When folding the whipped cream and chocolate mixture together, use a large rubber spatula and cut through the center, then gently turn the bowl as you fold the ingredients together. This preserves the air bubbles that create the mousse's light texture. Spread the mousse carefully to maintain its volume.
- Step 6:
- When blooming the gelatin, ensure all powder contacts water and has time to fully absorb it, which prevents grainy texture. Heat the cream to a full boil to ensure the gelatin completely dissolves. The white chocolate requires gentle handling—overheating can cause it to seize or become grainy. The folding technique is especially important here to maintain the light, airy texture while fully incorporating the chocolate mixture. Spread the white chocolate mousse in a slightly domed shape for an elegant presentation.
- Step 7:
- The full chilling time of 3-4 hours is non-negotiable—rushing this step will result in layers that slump or mix when cut. When unmolding, run a thin knife dipped in hot water around the edges if needed to release the cake cleanly. For chocolate curls, use a vegetable peeler against a slightly warmed chocolate bar. Apply the cocoa powder using a small sieve for the most even dusting.
 Pin it
My grandmother's birthday falls in the dead of winter, and this cake has become her special request every year. She claims the dark chocolate layer helps her remember summers in Italy from her childhood, where her mother would make a similar chocolate dessert using bars of chocolate brought home by her father.
The Science Behind Perfect Mousse
The success of this triple mousse cake relies on understanding the balance between structure and lightness. When making mousse, temperature control is absolutely critical. Chocolate must be melted but not hot when folded with whipped cream—too warm and it deflates the air bubbles, too cool and it forms small solid bits throughout the mousse. The egg yolks in the chocolate mousse serve a dual purpose: they add richness and create an emulsion that helps stabilize the mixture. Meanwhile, the gelatin in the white chocolate mousse compensates for white chocolate's softer setting properties. This difference in stabilization methods is why each layer holds its shape distinctly while still maintaining the light, airy texture that defines a proper mousse.
Troubleshooting Common Issues
Even experienced bakers encounter challenges with complex desserts like this one. If your chocolate seizes during melting (becomes grainy or solid), try adding a tablespoon of warm cream and stirring gently to recover a smooth texture. For mousse that isn't setting firmly enough, extended refrigeration can help, or place it in the freezer for 20-30 minutes before serving. If your cake layer seems dry, brush it lightly with simple syrup before adding the fudge layer. Bubbles in your mousse layers can be eliminated by gently tapping the pan on the counter several times during assembly. Remember that humidity affects how gelatin sets, so on particularly humid days, you might need to increase the gelatin slightly for the white chocolate layer.
 Pin it
Serving and Storage Tips
This Triple Chocolate Mousse Cake reaches its peak texture when allowed to sit at room temperature for 15-20 minutes before serving. This brief warming period softens the mousses just enough to highlight their silky texture while maintaining their structural integrity. When cutting, dip a long, sharp knife in hot water and wipe clean between slices for the cleanest presentation. The cake keeps beautifully for up to three days in the refrigerator, though the contrast between layers is most dramatic on the first and second days. For make-ahead convenience, you can freeze the assembled cake for up to two weeks—wrap it tightly after it's fully set, and thaw overnight in the refrigerator. The cake doesn't pair well with hot beverages, which can melt the delicate layers; instead, serve with cold milk, coffee liqueur, or a fruity dessert wine that complements chocolate's complex flavors.
Frequently Asked Questions
- → How do I make the chocolate layers smooth?
To make the layers smooth, use an offset spatula to spread each layer evenly. Chilling between layers helps maintain structure.
- → Can I substitute dark chocolate for semi-sweet chocolate?
Yes, you can substitute dark chocolate for semi-sweet chocolate, but it may alter the sweetness level slightly.
- → What if I don't have a springform pan?
If you don't have a springform pan, line a regular 8-inch pan with plastic wrap and parchment paper to create a similar effect.
- → Why is the gelatin used in the white chocolate mousse?
Gelatin helps stabilize the white chocolate mousse, ensuring it holds its shape once set and while layering.
- → How can I garnish the cake for a perfect finish?
Decorate the cake with chocolate curls, a light dusting of cocoa powder, or even fresh berries for an elegant presentation.
- → How long should I refrigerate the cake before serving?
Refrigerate the cake for at least 3-4 hours or until completely firm. This ensures the layers set correctly.