
 Pin it
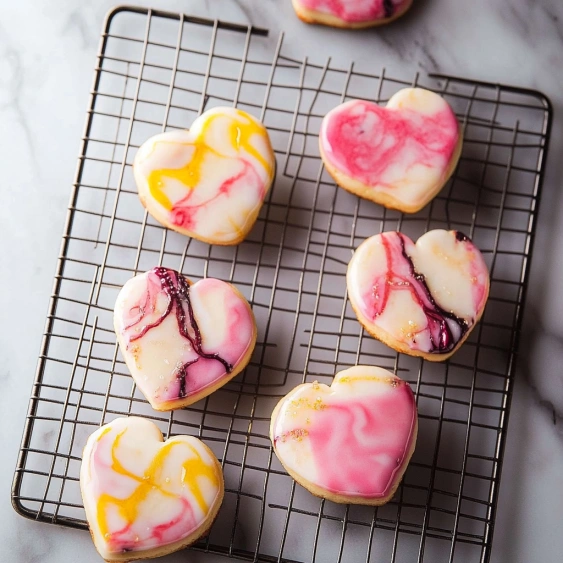
This vibrant tie-dye sugar cookie recipe transforms ordinary cookies into psychedelic works of art that are as fun to make as they are to eat. The marbled icing technique creates unique designs on each cookie, making them perfect for parties, gifts, or anytime you want to add a splash of color to your dessert table.
I first made these for my niece's birthday party, and the kids were mesmerized by the swirling colors. Now they're requested for every celebration, and adults are just as enchanted by them as the children.
Ingredients
- Batch of cut-out sugar cookies that have completely cooled: These provide the perfect blank canvas for your tie-dye designs
- Confectioners' sugar: Creates the smooth base for your icing, look for one without lumps for best results
- Milk: Thins the icing to the perfect consistency, use whole milk for richness
- Light corn syrup: Gives the icing that beautiful shine and helps it set properly
- Pure vanilla or almond extract: Optional but adds wonderful flavor to complement the sweetness
- Assorted gel food coloring: Gel colors are more concentrated than liquid and won't thin your icing, Wilton brand works particularly well
Step-by-Step Instructions
- Make the icing base:
- Whisk together confectioners' sugar, milk, corn syrup, and extract in a medium bowl until completely smooth. The consistency should be like honey, thick enough to coat but still able to drip slowly off a spoon. If it's too thick, add milk a few drops at a time. If too thin, add more confectioners' sugar. Cover with plastic wrap touching the surface to prevent a skin from forming if not using immediately.
- Create the tie-dye effect:
- Take a toothpick, small skewer or chopstick and dip it into your first gel food coloring. Drag it through the white icing creating streaks and swirls. Repeat with additional colors as desired, being careful not to overmix. The colors should remain distinct with visible streaks for the true tie-dye look. Work somewhat quickly as the icing can start to crust.
- Dip the cookies:
- Hold a cookie face down and gently dip the top surface into the colored icing. Allow excess to drip off for a moment, then carefully flip it right side up and place on a cooling rack. Each cookie will have a unique pattern depending on where in the icing you dip. Work methodically, one cookie at a time, for best results.
- Set the icing:
- Allow the cookies to rest undisturbed on the cooling rack for at least 4 hours, preferably overnight. The icing needs sufficient time to fully set and harden. During this time, keep them away from moisture and humidity which can prevent proper setting.
 Pin it
I particularly love using a combination of blues and purples for a galaxy effect. My daughter once said they looked like little edible universes, and watching her face light up as she picked her favorite "galaxy" to eat is one of my favorite baking memories.
Storage Tips
Once the icing has completely set, store cookies in an airtight container at room temperature. Place pieces of parchment paper between layers to prevent sticking. These cookies will stay fresh for up to a week, though the vibrant colors may begin to fade slightly after several days. Never refrigerate decorated sugar cookies as this can cause the colors to bleed and the cookies to become soft.
 Pin it
Color Combination Ideas
The magic of tie-dye cookies is in their infinite variety of color possibilities. For holidays, try red and green for Christmas, pastels for Easter, or orange and black for Halloween. Rainbow combinations are always popular with children, while more sophisticated palettes using shades of a single color create an elegant marble effect. For baby showers or gender reveal parties, pink and blue make a lovely combination. Just remember that limiting yourself to 2-3 complementary colors often creates the most striking results.
Troubleshooting Your Icing
Achieving the perfect icing consistency is crucial for successful tie-dye cookies. If your icing is too thin, the colors will run together and create a muddy appearance. Too thick, and the cookies won't dip smoothly, leaving uneven coverage. Test your icing by lifting a spoonful and letting it fall back into the bowl. It should create a ribbon that disappears back into the surface within about 10 seconds. If your colors start to blend too much during dipping, simply add fresh streaks with your food coloring to revitalize the tie-dye effect.
Frequently Asked Questions
- → Can I use liquid food coloring instead of gel?
Gel food coloring is recommended for this technique as it creates more vibrant colors and doesn't thin the icing. Liquid food coloring can work in a pinch, but you'll need to use less to avoid making the icing too runny, which may result in less vibrant colors.
- → How do I prevent the colors from getting muddy?
To keep colors bright and distinct, avoid excessive stirring after adding the food coloring. Use a toothpick or skewer to create light swirls rather than mixing thoroughly. You can also refresh the color streaks if they become too mixed during the dipping process.
- → Can I make these cookies ahead of time?
Yes! These cookies store well in an airtight container at room temperature for up to a week. The icing needs 4-12 hours to set completely, making them perfect for preparing a day before your event.
- → What's the best consistency for the icing?
The ideal consistency is similar to honey - thick enough to coat the cookie but thin enough to drizzle easily off a spoon. If your icing is too thick, add milk a few drops at a time. If it's too thin, add more confectioners' sugar.
- → Which cookie shapes work best for tie-dye effect?
Simple shapes like circles, hearts, or squares show off the tie-dye pattern beautifully. While any shape will work, cookies with less intricate edges allow the swirled colors to be more visible and create a more dramatic effect.
- → Can I add flavors to the icing?
Absolutely! The vanilla or almond extract adds a subtle flavor enhancement. You could also experiment with other extracts like lemon, orange, or peppermint depending on your preference or to complement seasonal themes.