
 Pin it
This homemade peppermint patty recipe transforms simple ingredients into a bakery-quality treat that rivals any store-bought version. The cool mint filling encased in rich chocolate creates that perfect balance of flavors that peppermint patty lovers crave.
I first made these peppermint patties during the holiday season when my daughter requested them for a school baking exchange. The recipe was such a hit that we now make them quarterly and store batches in the freezer for whenever the craving strikes.
Ingredients
- Powdered sugar: provides the sweet base and proper texture for the filling. Look for confectioners sugar without added starch for the smoothest result
- Unsalted butter: adds richness and helps bind the filling together. Make sure it's truly room temperature for proper incorporation
- Evaporated milk: creates creaminess without thinning the mixture too much. Do not substitute with regular milk
- Peppermint extract: delivers the signature cooling flavor. Pure extract rather than imitation gives a cleaner taste
- Vanilla extract: balances the mint with warmth. Even this small amount makes a noticeable difference
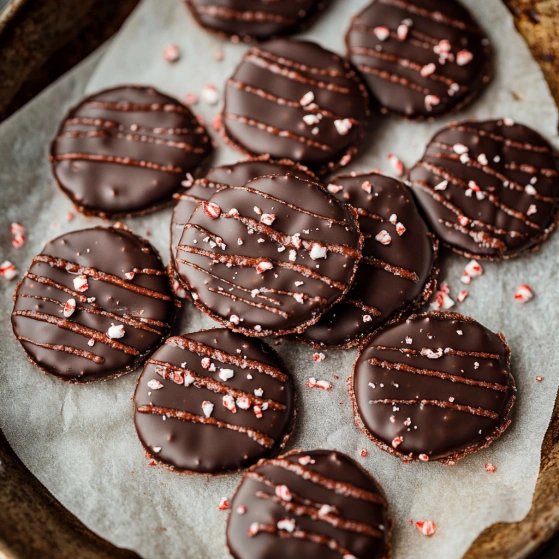
- Semisweet chocolate chips: form the perfect coating. Choose a quality brand as the chocolate flavor really matters
- Coconut oil: helps thin the chocolate for dipping and creates that satisfying snap when you bite into the finished patty
Step-by-Step Instructions
- Create the Filling:
- Beat powdered sugar and room temperature butter together on low speed until combined. The mixture will initially look very dry and crumbly which is normal. Continue mixing until it starts to come together.
- Add Wet Ingredients:
- Pour in the evaporated milk, peppermint extract, and vanilla extract. Increase to medium speed and beat thoroughly until the mixture forms a soft dough. It should hold together when pressed but still be somewhat stiff. If too dry, add a tiny bit more evaporated milk.
- Roll and Chill:
- Generously dust your work surface with powdered sugar and roll the filling to approximately ¼ inch thickness or your preferred thickness. For easiest handling, place another sheet of wax paper on top while rolling. Transfer the entire rolled sheet to a baking tray and freeze for at least 45 minutes until firm enough to cut cleanly.
- Cut Into Rounds:
- Remove from freezer and use a powdered sugar coated cookie cutter to punch out rounds. Work quickly to prevent softening. Place cut rounds on a wax paper lined sheet and return to freezer for 20 minutes to firm up again before dipping.
- Prepare Chocolate Coating:
- Combine chocolate chips and coconut oil in a microwave safe bowl. Heat in 30second intervals, stirring between each, until completely melted and smooth. The chocolate should be fluid but not hot enough to melt the filling.
- Dip and Finish:
- Working with a few pieces at a time while keeping the rest frozen, dip each round completely in the melted chocolate. Use a fork to lift each piece, allowing excess chocolate to drip off. Place on wax paper and return to freezer immediately after completing each batch.
 Pin it
My family particularly loves the rich semisweet chocolate coating against the sweet mint filling. My husband, who grew up on store bought peppermint patties, declares these homemade versions superior in every way. The first time I made them, he ate seven in one sitting before I had to hide the rest.
Troubleshooting Tips
If your peppermint filling becomes too soft while working with it, simply return it to the freezer for 15 minutes before continuing. The key to success with this recipe is keeping the filling cold at all times during the dipping process. When the filling warms up, it becomes sticky and difficult to handle.
Texture is extremely important with peppermint patties. If your filling seems too dry or crumbly, add additional evaporated milk a teaspoon at a time. Conversely, if the mixture seems too wet, incorporate additional powdered sugar until you reach a firm but pliable consistency that holds its shape.
Flavor Variations
While the classic peppermint flavor is traditional, this recipe offers a wonderful canvas for experimentation. Try substituting the peppermint extract with orange, raspberry, or almond extract for completely different flavor profiles. For holiday versions, consider adding a drop of food coloring to the filling mixture to create festive colors like red for Christmas or green for St. Patrick's Day.
Another delicious variation is to sprinkle the tops with crushed candy canes, flaky sea salt, or colored sprinkles immediately after dipping while the chocolate is still wet. This adds both visual appeal and textural contrast to your homemade peppermint patties.
 Pin it
Storage Guidelines
These peppermint patties actually improve with time as the flavors meld together. Store them in an airtight container with wax paper between layers to prevent sticking. While they keep well in the refrigerator for up to two weeks, freezer storage is ideal for longer preservation.
The frozen patties maintain perfect texture and can be enjoyed straight from the freezer or allowed to sit at room temperature for 5 minutes before serving. Many people, myself included, actually prefer the extra cooling sensation of eating them while still slightly frozen for that signature peppermint patty experience.
Frequently Asked Questions
- → Can I use milk chocolate instead of semi-sweet chocolate?
Yes, you can substitute milk chocolate for the semi-sweet chocolate if you prefer a sweeter, creamier coating. Just be aware that milk chocolate is more temperature-sensitive when melting, so watch it carefully to prevent scorching.
- → How thick should I roll the peppermint filling?
The recipe recommends rolling the filling to ¼ inch thickness, but you can adjust this to your preference. Thinner patties will be more delicate and have a higher chocolate-to-filling ratio, while thicker ones provide more of the creamy mint center.
- → Why do the patties need to be frozen before dipping?
Freezing the peppermint filling is crucial to maintain its shape during the chocolate dipping process. The cold filling prevents melting when it contacts the warm chocolate and makes handling much easier.
- → Can I add food coloring to the mint filling?
Absolutely! A few drops of green food coloring added to the filling mixture can create a festive appearance. Just add it when mixing in the extracts for even distribution.
- → How long do homemade peppermint patties last?
When stored in an airtight container with wax paper between layers, these peppermint patties will last about 2 weeks in the refrigerator. In the freezer, as the recipe mentions, they will keep indefinitely (though best quality is maintained for about 3 months).
- → What size cookie cutter works best for cutting the filling?
A 1.5 to 2-inch round cookie cutter works well for standard-sized peppermint patties. However, you can use any size depending on your preference—smaller for bite-sized treats or larger for more impressive presentation.