
 Pin it
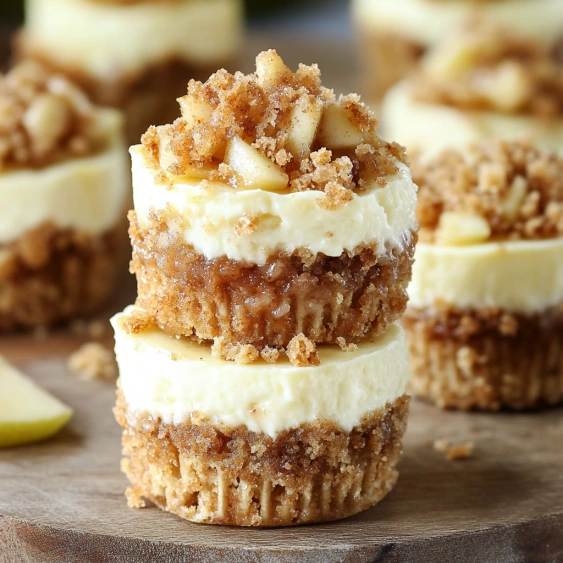
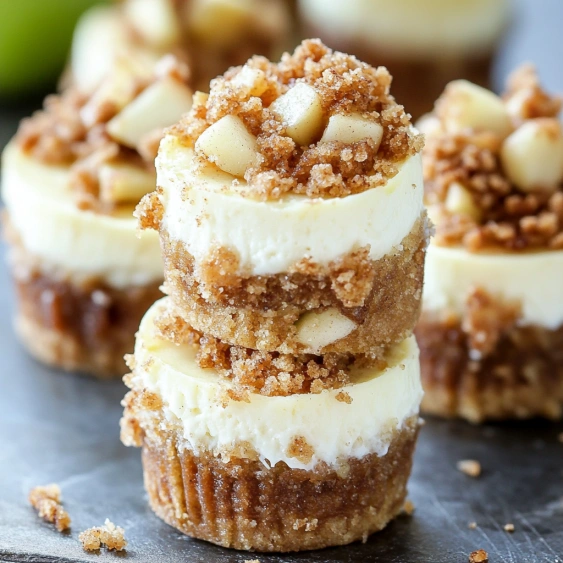
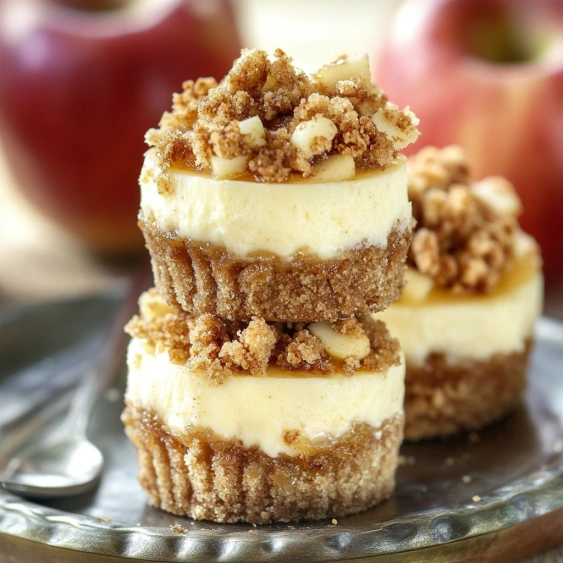
This delightful Apple Crisp Mini Cheesecakes recipe combines two beloved desserts into one perfect portable treat. The creamy cheesecake layer paired with cinnamon-spiced apples and that irresistible crumbly topping creates a dessert that tastes like fall in every bite.
I first created these mini cheesecakes for a neighborhood autumn potluck and they disappeared within minutes. Now they've become my signature dessert whenever someone asks me to bring something sweet to a gathering.
Ingredients
- Graham cracker crumbs: fresh is best but store bought works perfectly too
- Cinnamon: adds warmth to every layer of this dessert
- Unsalted butter: allows you to control the saltiness while providing richness
- Quick cooking oats: create that classic apple crisp texture you crave
- Brown sugar: delivers caramel notes that complement the apples beautifully
- Medium small apples: choose firm varieties like Granny Smith or Honeycrisp that hold their shape when baked
- Lemon juice: prevents the apples from browning and adds a bright note
- Cream cheese: use full fat for the creamiest texture always bring to room temperature
- Vanilla extract: pure not imitation for the best flavor
- Caramel sauce: store bought works but homemade takes these to another level
Step-by-Step Instructions
- Prepare the Pan:
- Line a standard cupcake pan with paper liners. This recipe makes exactly 9 mini cheesecakes. Preheat your oven to 325°F which is lower than typical baking temperature to ensure the cheesecakes bake gently and don't crack.
- Make the Graham Cracker Crust:
- Mix graham cracker crumbs with sugar and cinnamon until well combined. Pour in the melted butter and stir until the mixture resembles wet sand. Press firmly about 2 tablespoons of the mixture into the bottom of each liner using the back of a measuring spoon works perfectly. Place the pan in the refrigerator to firm up while you prepare the other components.
- Prepare the Crumb Topping:
- Combine the flour brown sugar oats cinnamon and nutmeg in a bowl. Pour in melted butter and mix with a fork until you have coarse crumbs that hold together when pressed. The texture should resemble small pebbles. Refrigerate this mixture to help it maintain distinct crumbs during baking.
- Mix the Cheesecake Filling:
- Beat the softened cream cheese until completely smooth with no lumps this is crucial for the perfect texture. Add sugar vanilla and flour and mix until just incorporated. Add the egg and mix on low speed just until combined overmixing will incorporate too much air leading to cracks. The filling should be silky smooth.
- Prepare the Apple Filling:
- Toss the finely chopped apples with lemon juice to prevent browning. Add brown sugar cornstarch cinnamon and nutmeg stirring until every piece is coated. The cornstarch will thicken the apple juices as they bake creating a luscious sauce within the dessert.
- Assemble the Cheesecakes:
- Spoon the cheesecake filling over each crust filling each cup about 2/3 full. Layer the apple mixture on top gently pressing down slightly to compact. Generously sprinkle the refrigerated crumb topping over the apples covering them completely.
- Bake to Perfection:
- Bake for 28-30 minutes until the edges are set but the centers still have a slight jiggle. The tops should be golden brown and fragrant. Avoid opening the oven door during baking as temperature fluctuations can cause cheesecakes to sink.
- Cool Properly:
- Allow the cheesecakes to cool in the pan for 30 minutes then carefully remove to a wire rack. Once completely cool refrigerate for at least 4 hours or preferably overnight for the flavors to meld and the texture to set perfectly.
- Serve with Style:
- Just before serving drizzle with warm caramel sauce for that final touch of decadence. The contrast between the cold cheesecake and warm sauce creates a magical experience.
 Pin it
The secret to these mini cheesecakes is in the layering. I discovered that placing the apples on top of the cheesecake rather than mixing them in creates distinct layers of flavor and texture that make each bite an adventure. My grandmother always said good baking is like telling a story with flavors and these little desserts definitely tell a delicious tale.
Storage Tips
These mini cheesecakes keep beautifully in an airtight container in the refrigerator for up to 5 days. The flavors actually improve after a day as they meld together. For longer storage they can be frozen without the caramel sauce for up to 3 months. Simply thaw overnight in the refrigerator before serving. The caramel sauce should be stored separately in the refrigerator and gently warmed before drizzling over the cheesecakes.
 Pin it
Customization Options
This versatile recipe welcomes many variations. Try pears instead of apples for a subtle change or add a handful of fresh cranberries during the holiday season for a pop of color and tartness. For a deeper flavor consider adding 1/4 teaspoon of cardamom to the apple mixture or stirring 1/2 cup of toasted chopped pecans into the crumb topping. For special occasions a tablespoon of bourbon in the apple filling adds wonderful complexity.
Make Ahead Strategy
These mini cheesecakes are perfect for busy hosts. Prepare them up to three days before your event and store them covered in the refrigerator. You can even freeze them for up to three months without the caramel sauce. The day of serving simply thaw in the refrigerator and add the warm caramel drizzle just before presenting. This make ahead capability makes them ideal for holiday dessert tables or brunch gatherings.
The Perfect Occasion
These charming individual desserts shine at fall gatherings but their appeal extends beyond autumn. Serve them at bridal showers baby celebrations or Sunday family dinners. During the holidays add a tiny decorative apple slice on top or a small cinnamon stick for festive presentation. The individual portions eliminate the need for cutting and serving a traditional cheesecake making them perfect for buffet style events.
Frequently Asked Questions
- → Can I make these Apple Crisp Mini Cheesecakes ahead of time?
Yes! These mini cheesecakes are perfect for making ahead. After baking and cooling completely, store them in an airtight container in the refrigerator for up to 3 days. Add the caramel drizzle just before serving for the best presentation and texture.
- → What type of apples work best in this dessert?
Firm, tart apples like Granny Smith, Honeycrisp, or Pink Lady work excellently in this recipe. They hold their shape during baking and provide a nice contrast to the sweet cheesecake filling and caramel topping. Avoid softer varieties that might become mushy during baking.
- → Can I freeze these mini cheesecakes?
Yes, these mini cheesecakes freeze well! Cool them completely, then place in a freezer-safe container without the caramel sauce. Freeze for up to 2 months. Thaw overnight in the refrigerator and add caramel drizzle before serving.
- → What can I substitute for graham crackers in the crust?
If graham crackers aren't available, you can substitute digestive biscuits, vanilla wafers, or gingersnaps for the crust. Simply crush them to fine crumbs and use the same measurement as called for in the recipe. Each alternative will add its own unique flavor profile.
- → How do I know when the mini cheesecakes are done baking?
The mini cheesecakes are done when the edges appear set but the center still has a slight jiggle when gently shaken. They will continue to set as they cool. Overbaking can cause the cheesecakes to crack and become dry, so it's better to slightly underbake than overbake.
- → Can I use store-bought caramel sauce?
Absolutely! While homemade caramel sauce is delicious, a quality store-bought caramel sauce works perfectly as a time-saving alternative. Look for a thicker sauce that will create beautiful drizzles without running off the sides too quickly.