
 Pin it
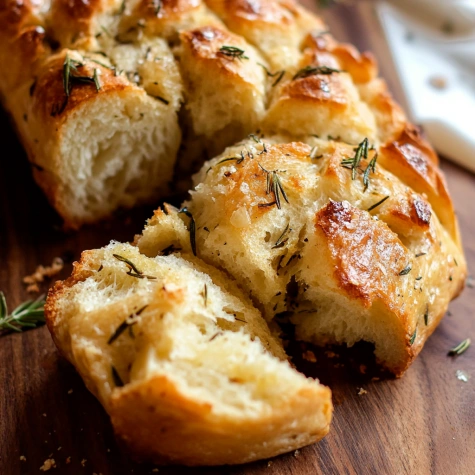
Rosemary Garlic Pull Apart Bread transforms ordinary bread into an exquisite experience. Each buttery, herb-infused piece pulls away with a perfect combination of garlic, rosemary, and cheese. This showstopper pairs beautifully with pasta or stands alone as an appetizer, giving you bakery-quality results from your home kitchen. The dough's softness and the filling's richness create a texture that's crisp outside and pillowy inside.
I made this bread last weekend when my sister visited, and watching everyone's faces as they pulled apart the first pieces was priceless. The cheese formed these perfect little stretchy strings between pieces, and we ended up fighting over the last bit!
Ingredients - What You'll Need
- Platinum Yeast from Red Star: A reliable, fast-acting yeast that creates consistent results; I find it more forgiving than other varieties when working with enriched doughs
- Whole milk: Provides richness and tenderness to the dough; the fat content matters, so avoid substituting with lower-fat alternatives
- Unsalted butter: Appears in the dough and filling; using unsalted allows precise control over the saltiness while adding necessary richness
- All-purpose flour: Creates the perfect structure; measure by spooning into cups and leveling for accuracy to avoid a dense result
- Fresh rosemary and parsley: The backbone of flavor; fresh herbs provide brighter, more complex notes, though dried work in a pinch
- Garlic: Both powder and fresh garlic create layers of flavor; fresh provides punch in the filling while powder infuses the entire dough
- Cheese: The flexible component; parmesan adds sharpness, while mozzarella contributes that satisfying stretch factor
- Sea salt topping: An optional finish that elevates the flavor with occasional bursts of saltiness and textural contrast
Step-by-Step Instructions
- Step 1:
- Mix yeast and sugar in your stand mixer bowl (or regular bowl if mixing by hand). Warm the milk to about 110°F—this temperature is crucial as too hot will kill the yeast and too cool won't activate it properly. Pour the warm milk over the yeast mixture, give it a gentle whisk, then cover with a kitchen towel. During this 5-10 minute rest, the mixture should become frothy, indicating your yeast is alive and ready to work. This fermentation process begins developing flavor and starts the gas production that will make your bread rise.
- Step 2:
- Add butter, egg, flour, salt, garlic powder, and rosemary to your frothy yeast mixture. Beat on low speed until everything comes together and the dough begins pulling away from the sides, which takes about 3 minutes. The dough should feel soft but manageable. If it's sticking stubbornly to the bowl, add flour gradually in tablespoon increments—too much will make dry bread, so add just enough to make it workable. The dough will still feel tacky but shouldn't be leaving significant residue on your fingers.
- Step 3:
- Continue kneading the dough for a full 5 minutes, either with your mixer's dough hook or by hand on a lightly floured surface. This step develops gluten, creating the structure that allows your bread to rise properly. To test if kneading is complete, poke the dough gently—it should slowly spring back. For a more definitive test, try the windowpane method: stretch a small piece until thin enough for light to pass through without tearing. Proper kneading ensures your bread will have that perfect chewy texture rather than being dense or crumbly.
- Step 4:
- Shape your kneaded dough into a ball, place it in a greased bowl, and cover with plastic wrap or aluminum foil. Find a warm spot for the dough to double in size, which takes 60-90 minutes. During this time, the yeast feeds on sugars in the dough, producing carbon dioxide that creates air pockets. This first rise (bulk fermentation) develops flavor complexity and proper texture. While waiting, prepare your filling and grease your loaf pan to stay efficient.
- Step 5:
- Mix soft butter with rosemary, parsley, garlic, and salt until completely combined. The butter must be very soft—but not melted—to spread easily later. Room temperature butter incorporates air when mixed, creating a lighter texture. If made ahead, don't refrigerate the mixture unless necessary, as cold filling is difficult to spread thinly. This herb-butter mixture will melt during baking, infusing the bread layers with aromatic flavors.
- Step 6:
- After the first rise, punch down the dough to remove large air pockets. Divide into 12 equal pieces (about 1/4 cup each). With lightly floured hands, flatten each piece into a 4-inch circle—perfection isn't necessary. Spread 1-2 teaspoons of herb butter on each circle, then sprinkle with a tablespoon of cheese. Fold each circle in half and arrange in your prepared loaf pan with rounded sides facing up. This folding technique creates beautiful layers that will pull apart easily after baking.
- Step 7:
- Cover the assembled loaf and let it rise again until puffy, about 45 minutes. This second rise (proofing) allows the dough to regain volume after handling. Preheat your oven to 350°F with the rack in the lower third position. Bake for approximately 50 minutes until deeply golden. If the top browns too quickly, tent with foil. Don't worry about butter melting around the edges—it will be absorbed into the bread. After baking, brush with melted butter and sprinkle with sea salt if desired, then cool in the pan for 10 minutes before removing.
 Pin it
Fresh rosemary has become a staple in my herb garden, and this recipe is the main reason why. My youngest daughter used to pick out herbs from everything, but after trying this bread, she now helps me harvest rosemary specifically for this recipe. The first time she pulled apart her own piece and declared it "better than pizza" was a victory I'll never forget.
Making Ahead and Storage Tips
This bread fits perfectly into busy schedules when planned properly. Prepare the dough the night before and let it complete its first rise in the refrigerator overnight. The slow, cold fermentation actually develops more complex flavors. The next morning, let the dough sit at room temperature for 30 minutes before shaping and continuing with the recipe. Alternatively, you can freeze the baked bread for up to 3 months. Wrap it tightly in plastic wrap and then foil before freezing, and thaw overnight in the refrigerator before reheating in a 300°F oven until warmed through.
Troubleshooting Common Issues
The success of this bread depends on a few critical factors that are easy to control once you understand them. If your dough doesn't rise properly, temperature is likely the culprit—either the milk was too hot and killed the yeast, or your rising environment was too cold. For slow rising, create a warm environment by preheating your oven to its lowest setting, turning it off, and then placing the covered dough inside. Another common issue is tough bread, which happens when too much flour is added during kneading. Remember that the dough should remain somewhat tacky; adding just enough flour to make it workable preserves the soft texture that makes this bread irresistible.
 Pin it
Serving Suggestions
Transform this bread from a side dish to the centerpiece of a memorable meal with thoughtful pairings. For an easy weeknight dinner, serve alongside a simple tomato soup for a sophisticated twist on comfort food. The bread's garlic and herb flavors complement the acidity of tomatoes perfectly. For entertaining, place the bread in the center of a charcuterie board with olive oil for dipping, surrounded by cured meats and olives. The pull-apart nature encourages sharing and conversation. During holiday meals, this bread upstages traditional dinner rolls while still providing that necessary vehicle for soaking up gravy or sauce. Its impressive appearance belies how simple it is to prepare, making it my secret weapon for gatherings where I want maximum impact with minimal stress.
Frequently Asked Questions
- → Can I use dried rosemary instead of fresh?
Yes, you can replace fresh rosemary with dried rosemary. Use 2 teaspoons dried rosemary in place of 1 tablespoon fresh rosemary for both the dough and filling.
- → How do I store leftover bread?
Store leftovers at room temperature for up to 2 days or in the refrigerator for up to 1 week. Reheat in a 300°F oven for 10–15 minutes or in the microwave to restore softness.
- → Can I use a different type of cheese?
Absolutely! You can substitute parmesan, mozzarella, or white cheddar with your preferred shredded cheese for a personalized flavor.
- → What if I don’t have a stand mixer?
No problem! You can mix the dough by hand using a wooden spoon or silicone spatula. Knead the dough on a floured surface for about 5 minutes until it’s soft and slightly tacky.
- → How can I tell if the dough is kneaded enough?
Perform the windowpane test: tear off a small piece of dough, stretch it thinly, and see if light passes through without tearing. If it does, the dough is ready.