
 Pin it
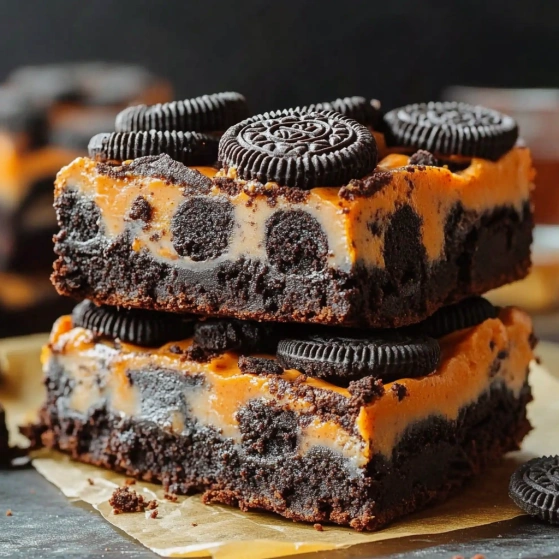
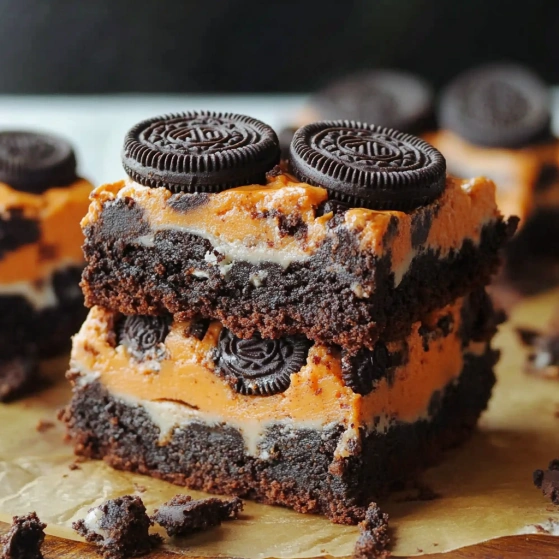
These decadent Halloween Oreo Layered Brownies transform a simple brownie mix into a show-stopping dessert that's perfect for your October gatherings. The combination of fudgy brownies, seasonal orange-filled Oreos, and dual frosting creates an irresistible treat that looks as festive as it tastes.
I first created these brownies for my daughter's school Halloween party, and they disappeared faster than any other treat on the table. The teachers even requested the recipe afterward, which is always the highest compliment.
Ingredients
- Brownie Mix: Provides the perfect fudgy base and saves significant time compared to making brownies from scratch
- Eggs: Create structure and richness in the brownies
- Oil: Keeps the brownies moist and tender
- Milk: Substitutes for water in the mix for a more decadent flavor
- Halloween Oreos with orange filling: These seasonal cookies add both visual appeal and a subtle flavor twist
- Milk chocolate frosting: Creates rich contrast against the orange layer
- White or Vanilla frosting: Serves as the base for the vibrant orange middle layer
- Orange food coloring gel: Provides more intense color than liquid food coloring for a true Halloween orange
Step-by-Step Instructions
- Prepare Your Pan:
- Preheat your oven to 350°F and line a 9x9 inch baking pan with parchment paper, leaving some overhang on the sides to easily lift the brownies out later. A light spritz of cooking spray under the parchment prevents any sticking.
- Mix The Brownie Batter:
- In your stand mixer with a whisk attachment, combine the brownie mix, eggs, oil, and milk. Mix on medium speed for about 2 minutes until completely smooth and slightly thickened. Be careful not to overmix as this can create tough brownies.
- Layer The Base:
- Pour the brownie batter into your prepared pan, using a spatula to ensure it spreads evenly into the corners. Gently tap the pan on the counter a few times to release any air bubbles trapped in the batter.
- Add The Oreo Layer:
- Arrange the orange-filled Halloween Oreos in neat rows on top of the brownie batter. Press them down very slightly so they sink just a bit into the batter but remain visible on top. This creates that distinct layered effect when sliced.
- Bake To Perfection:
- Place the pan in your preheated oven and bake for 25-30 minutes. Check for doneness by inserting a toothpick into the center between cookies. It should come out with a few moist crumbs but not wet batter. The brownies will continue cooking slightly as they cool.
- Cool Completely:
- Allow the brownies to cool in the pan for at least 30 minutes, then use the parchment paper overhang to lift them out onto a cooling rack. Let them cool completely before frosting, about 1-2 hours.
- Create Orange Frosting:
- While the brownies cool, prepare the orange frosting. Twist apart about 10 Oreos and scrape the orange filling into a bowl with the white or vanilla frosting. Add 1 teaspoon of orange food coloring gel and mix until fully combined. Adjust the color as needed for a vibrant Halloween orange.
- Apply First Frosting Layer:
- Spread the orange frosting evenly over the cooled brownies using an offset spatula. Place in the refrigerator for 30 minutes to set this layer before adding the next frosting.
- Add Chocolate Layer:
- After the orange layer has set, spread the milk chocolate frosting evenly over the top. Work quickly but carefully to avoid mixing the two frosting layers.
- Finish With Oreo Crumbles:
- Crush the remaining Oreos by placing them in a zip-top bag and gently smashing with a rolling pin. Sprinkle these crumbles over the chocolate frosting, pressing down slightly so they adhere.
 Pin it
The first time I made these, I actually used leftover Oreos from my pantry and they were still a massive hit with the neighborhood kids who stopped by.
Make-Ahead Tips
These brownies actually taste even better the day after baking, as the flavors have time to meld together. Store them in an airtight container in the refrigerator for up to 5 days. Let them come to room temperature before serving for the best texture and flavor experience.
Ingredient Substitutions
If Halloween Oreos are unavailable, use regular Oreos and simply add more orange food coloring to your white frosting. For a homemade touch, you can substitute the canned frosting with your favorite buttercream recipe. Two cups of homemade frosting will replace each can called for in the recipe.
Serving Suggestions
These brownies make a stunning centerpiece on a Halloween dessert table. Try serving them alongside cups of warm apple cider for a perfect fall pairing. For an extra festive touch, add Halloween-themed sprinkles to the top of the chocolate frosting before the Oreo crumbles.
 Pin it
Frequently Asked Questions
- → Can I use regular Oreos instead of Halloween Oreos?
Yes, you can use regular Oreos if Halloween ones aren't available. For the orange color, simply add a bit more orange food coloring to the vanilla frosting layer. The taste will be slightly different without the orange-flavored filling, but still delicious.
- → How do I store these brownies?
Store the brownies in an airtight container in the refrigerator for up to 5 days. The frosting layers will remain fresh longer when refrigerated. Let them come to room temperature for about 20 minutes before serving for the best texture and flavor.
- → Can I freeze these brownies?
Yes, these brownies freeze well. Cut them into portions, wrap each piece individually in plastic wrap, then store in a freezer-safe container for up to 3 months. Thaw overnight in the refrigerator before serving.
- → What can I substitute for the boxed brownie mix?
You can substitute the boxed mix with your favorite homemade brownie recipe. Just ensure it's formulated for a 9x9 inch pan. Look for a fudgy brownie recipe rather than a cakey one for the best results with the Oreo layer.
- → Can I make these brownies in advance for a party?
Absolutely! These brownies actually taste better when made a day ahead, as the flavors have time to meld. Complete all the steps, refrigerate overnight, and they'll be perfect for serving at your Halloween gathering the next day.
- → How do I achieve clean cuts on these layered brownies?
For clean cuts, refrigerate the brownies for at least 2 hours before slicing. Use a sharp knife dipped in hot water and wiped clean between cuts. The cold brownies and warm knife will create cleaner edges through the multiple layers.