
 Pin it
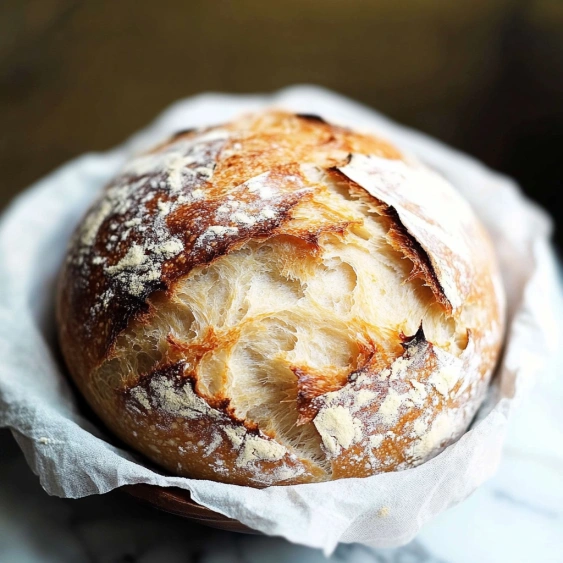
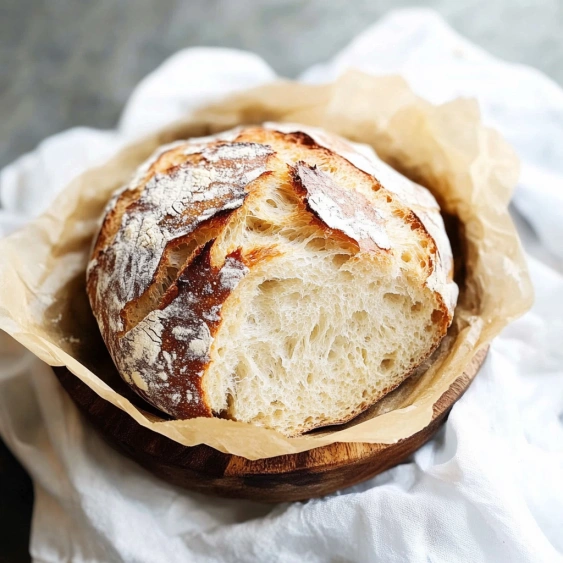
This miracle no-knead bread transforms just four basic ingredients into a bakery-quality loaf with a crackling crust and tender interior. The method breaks all traditional bread-making rules by eliminating the most intimidating step—kneading—while delivering superior results that will make you feel like a professional baker.
I discovered this technique during a snowstorm when I couldn't get to the store. My family was so impressed with the results that we haven't bought bread since. Even my mother-in-law, who has been baking bread for 40 years, asked for the recipe after her first bite.
Ingredients
- All purpose flour: Regular flour works beautifully here, no need for bread flour. The protein content in all purpose creates the perfect structure.
- Salt: Enhances flavor and controls yeast activity. I prefer kosher salt for its clean taste and easy measurement.
- Instant yeast: Just a small amount does all the work overnight. Make sure yours hasn't expired for best results.
- Room temperature water: The temperature matters. Too hot will kill the yeast, too cold will slow fermentation. Water straight from the tap is perfect.
Step-by-Step Instructions
- Mixing the dough:
- Whisk flour, salt, and yeast in a large bowl until completely combined. Pour in water and stir until a shaggy, somewhat sticky dough forms. It will look nothing like traditional bread dough. Trust the process even when it looks messy and uneven.
- Fermentation:
- Cover the bowl with plastic wrap and let sit at room temperature for 12 to 18 hours. This long, slow fermentation develops flavor complexity impossible to achieve with quick breads. The dough will more than double, becoming bubbly and puffy.
- Preparing for baking:
- Heat your Dutch oven in a 450°F oven for 30 minutes. Meanwhile, turn your dough onto a generously floured surface. The dough will be very loose and sticky. With floured hands, gently shape into a round without kneading. Place on parchment paper and cover while pot heats.
- Baking covered:
- Carefully lower the parchment with dough into the screaming hot Dutch oven. The covered environment creates steam that develops that crackling crust. Bake covered for 30 minutes to trap moisture and create steam.
- Finishing uncovered:
- Remove the lid and bake for 10 to 15 more minutes until deeply golden. This final uncovered bake creates that signature crackly crust. Cool completely before slicing for best texture.
 Pin it
This recipe sparked my bread baking journey five years ago. The simplicity amazed me, but what kept me making it was how it transformed our family dinners. Something about breaking open a steaming loaf of homemade bread makes everyone linger at the table longer, sharing stories I might have otherwise missed.
Understanding Fermentation
The magic of this bread happens during the long room temperature rest. Enzymes in the flour break down starches into sugars, which yeast then converts to carbon dioxide and alcohol, creating flavor compounds impossible to replicate with quick methods. The tiny amount of yeast works slowly, developing character rather than just lift. In warmer kitchens, 12 hours is sufficient, while cooler environments benefit from the full 18 hours. You will know fermentation is complete when the dough surface has many bubbles and has at least doubled in size.
Storage Solutions
This bread maintains its superior crust quality when stored cut side down on a cutting board for the first day. For longer storage, wrap in a clean kitchen towel then place in a paper bag. Avoid plastic bags which soften the crust. To refresh day old bread, sprinkle with water and heat in a 350°F oven for 5 to 10 minutes. The bread also freezes exceptionally well. Slice before freezing, then toast slices directly from frozen for breakfast.
Flour Variations
While the basic recipe calls for all purpose flour, experimenting with different flour blends creates unique flavors and textures. Substitute up to one cup of the all purpose flour with whole wheat for a nuttier flavor and more fiber. For a tangier loaf with more complex flavor, replace half a cup of flour with rye flour. Remember that adding whole grain flours may require a tablespoon or two more water since they absorb more moisture than white flour.
 Pin it
Serving Suggestions
This bread shines in its simplicity served warm with good quality salted butter. For a special appetizer, brush slices with olive oil, toast, and top with fresh tomatoes and basil. The sturdy crust and open crumb structure make it perfect for dipping in soups or soaking up pasta sauce. Leftover bread makes phenomenal croutons or breadcrumbs that far surpass store bought versions in flavor.
Frequently Asked Questions
- → Why doesn't this bread require kneading?
The long fermentation time (12-18 hours) allows the gluten to develop naturally without kneading. The enzymes in the flour break down the proteins, and the slow yeast action creates the perfect structure.
- → Can I use different types of flour?
Yes! You can substitute up to half the all-purpose flour with whole wheat, bread flour, or other grain flours. However, using 100% whole grain flours may require adjusting the water content and will yield a denser loaf.
- → Why is a Dutch oven necessary?
The Dutch oven creates a sealed environment that traps steam from the dough, which creates the crispy, crackly crust. The heavy cast iron also maintains consistent heat for proper baking. If you don't have one, a heavy covered pot can work as an alternative.
- → How should I store this bread?
This bread is best the day it's baked. Store leftovers cut-side down on a cutting board or in a paper bag for 1-2 days. For longer storage, slice and freeze in an airtight container for up to 3 months.
- → Can I add other ingredients to the dough?
Absolutely! Add herbs, garlic, cheese, nuts, dried fruit, or olives for variations. Fold them gently into the dough before the long rest, or just before shaping the loaf. About 1/2 to 1 cup of add-ins works well.
- → What if my dough is too wet or too dry?
The dough should be shaggy and wet, but not soupy. If it's too dry, add water a tablespoon at a time. If too wet, add flour a tablespoon at a time during the shaping phase. Environmental humidity can affect the exact flour-to-water ratio needed.