
 Pin it
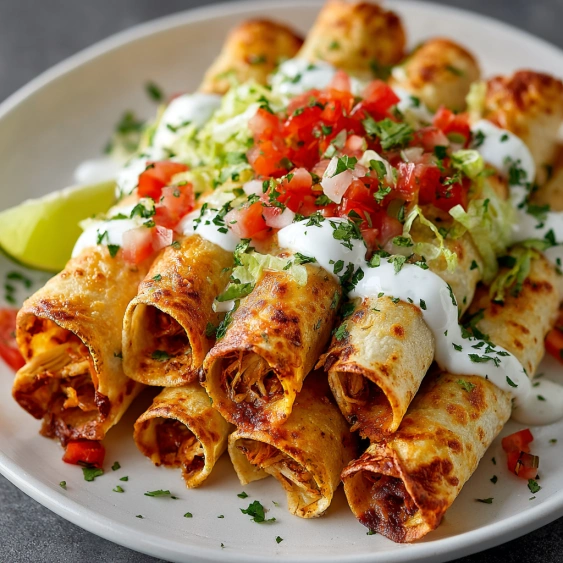
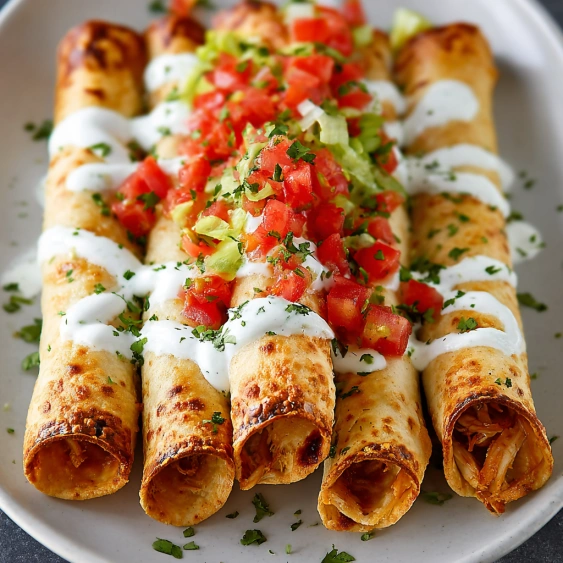
This baked chicken taquitos recipe transforms ordinary shredded chicken into crispy, flavorful rolled tacos that are healthier than their fried counterparts. The creamy, zesty filling wrapped in golden-baked tortillas delivers restaurant-quality results with minimal effort.
I first made these taquitos for a game night with friends, and they disappeared within minutes. Now they're my go-to whenever I need an impressive appetizer that doesn't keep me in the kitchen all day.
Ingredients
- Cooked shredded chicken: Provides the hearty protein base; choose rotisserie for convenience and flavor
- Cream cheese: Creates a creamy binding texture that holds everything together
- Fresh lime juice: Adds brightness and cuts through the richness
- Salsa verde: Brings tangy heat and authentic Mexican flavor
- Dried minced onion: Offers convenience with concentrated flavor
- Chili powder: Contributes warm depth and color
- Garlic powder: Infuses savory notes throughout the filling
- Ground cumin: Adds earthy smokiness essential for authentic taste
- Fresh cilantro: Provides bright herbal notes that balance the rich filling
- Green onions: Add mild onion flavor and pretty color contrast
- Monterey Jack cheese: Melts beautifully inside creating stretchy cheesy bites
- Flour tortillas: Make rolling easier for beginners; corn tortillas offer more authentic flavor
Step-by-Step Instructions
- Prepare the Oven:
- Preheat your oven to 400°F and line a large baking sheet with nonstick spray. The high temperature ensures the taquitos get crispy on the outside while staying tender inside.
- Mix the Filling:
- In a large bowl, thoroughly combine cream cheese, lime juice, and salsa verde until smooth. This creates the creamy base. Then blend in all the spices: dried minced onion, chili powder, garlic powder, and cumin. Make sure to evenly distribute the spices throughout the mixture for consistent flavor in every bite.
- Add Fresh Elements:
- Gently fold in the cilantro, green onion, and shredded cheese. These ingredients add texture and freshness to balance the creamy elements. Finally, incorporate the shredded chicken, ensuring it's evenly coated with the mixture for maximum flavor in every bite.
- Warm and Fill Tortillas:
- Microwave the tortillas for 10-15 seconds until just pliable. This crucial step prevents cracking during rolling. Working quickly with one tortilla at a time, spread about ¼ cup of filling in a line down the center of each tortilla.
- Roll and Arrange:
- Tightly roll each tortilla around the filling and place seam-side down on your prepared baking sheet. Position them closely but not touching to allow even browning. A light spray of cooking oil on top ensures golden, crispy exteriors.
- Bake to Perfection:
- Bake for 15-20 minutes, watching carefully toward the end. The perfect taquito has golden brown edges and a crisp exterior while maintaining a soft interior. Let them cool for 2-3 minutes before serving to allow the filling to set slightly.
 Pin it
My favorite part of this recipe is the perfect balance of creamy and crunchy textures. My nephew once declared these "better than restaurant taquitos" and requested them for his birthday dinner three years in a row.
Make-Ahead Options
These taquitos work wonderfully as a meal prep option. You can prepare the filling up to two days in advance and store it covered in the refrigerator. When ready to serve, simply warm your tortillas, roll, and bake. For even more convenience, you can assemble the entire taquitos, place them on a baking sheet, cover tightly with plastic wrap, and refrigerate for up to 24 hours before baking. Just add 2-3 minutes to the baking time if cooking from cold.
Serving Suggestions
Elevate your taquitos by serving them with an array of dipping options. Guacamole, sour cream, extra salsa verde, and pico de gallo create a festive spread. For a complete meal, pair with Mexican rice and refried beans. These taquitos also make excellent party food when cut in half and arranged standing up in a wide, shallow bowl with dips in the center. My family enjoys them most when I create a DIY toppings bar with shredded lettuce, diced tomatoes, sliced olives, and Mexican crema.
 Pin it
Customization Ideas
The beauty of this recipe lies in its versatility. You can easily substitute ground beef, pork, or black beans for the chicken. For a vegetarian version, replace the chicken with sautéed mushrooms and corn or a mixture of black beans and roasted sweet potatoes. Heat lovers can add diced jalapeños or a dash of hot sauce to the filling. For a breakfast twist, try filling them with scrambled eggs, chorizo, and cheese. My personal favorite variation includes adding a few tablespoons of diced roasted poblano peppers to the filling for a subtle smoky flavor.
Frequently Asked Questions
- → Can I use corn tortillas instead of flour tortillas?
Yes, you can substitute corn tortillas for a more authentic flavor and gluten-free option. The recipe notes you'll need about 20 corn tortillas instead of 12 flour tortillas. Just be sure to warm them slightly before rolling to prevent cracking.
- → How can I make these taquitos ahead of time?
You can prepare the filling and roll the taquitos up to 24 hours in advance. Store them covered in the refrigerator, then bake when ready to serve. You may need to add 2-3 minutes to the baking time if cooking from cold.
- → What can I serve with these chicken taquitos?
These taquitos pair wonderfully with guacamole, sour cream, pico de gallo, or additional salsa verde for dipping. A simple side salad or Mexican rice makes it a complete meal.
- → Can I freeze these taquitos?
Absolutely! After baking, allow them to cool completely, then freeze in a single layer on a baking sheet. Once frozen, transfer to a freezer bag. Reheat in a 375°F oven for 10-15 minutes until heated through and crispy again.
- → What's the best way to reheat leftover taquitos?
For the crispiest results, reheat leftover taquitos in an oven or toaster oven at 350°F for 5-7 minutes. Microwaving is faster but will make them softer rather than crispy.
- → Can I use other meats instead of chicken?
Yes, shredded beef, pork, or even turkey would work well with these same seasonings. Just ensure the meat is cooked and shredded before mixing with the other ingredients.